Getting More Performance from Your Flame Cutting Operation
Metal cutting is one of the most basic metal fabrication functions. It can affect part costs when it impinges on all subsequent operations such as Forming, Welding, Finishing and painting.
Cutting solutions principally fall into two categories: mechanical, also known as cold-cutting, or hot-cutting processes.
Mechanical processes are shearing, trimming, sawing, Waterjet Cutting, grinding, drilling and punching. These engineered processes are very effective with well-tested parameters and limits that manage tools or tooth design, grit size, tool rotation speed and feed rate for each specific metal.
Hot processes including flame, plasma and laser cutting. These are less definitive and allow a wider range of function, which can be a benefit to the skilled operator or an obstacle to the neophyte.
Principally, these hot processes produce a narrow kerf of molten metal that is blown out by an invisible gas. The invisible gas, cutting oxygen, is the tool point of the process, producing quality cut parts or ones that need significant rework. This makes understanding of the process a bit more mysterious.
The residual heat contributes to distortion, metal growth and shrinkage, making accurately cutting parts a challenge for the machine operator and supervisor. This process is sometimes referred to as “black magic,” and it can be overcome with some simple attention to detail.
The range of the flame-cutting process in metal, primarily steel, varies in thickness from 30 gauge to 72 inches, primarily found within foundry and steel mill applications. Cutting accuracy depends on the table and torch, but it’s typically within 0.062 to 0.5 inches. However, these tolerances are no longer acceptable to the industry and can be improved.
The oxy-fuel torch, with addition of iron powder injected into the flame, can cut through steel, stainless steel, aluminum, concrete or rock and is a very effective tool for punching holes and then breaking the object along a hole-pierced line.
Cutting more accurate parts with the flame-cutting process
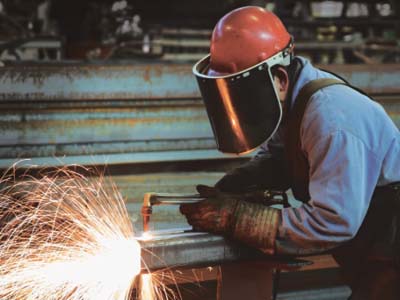
Newer Cutting Machines have contributed significantly to more accurate cutting. The use of dual-drive systems for larger plates produces more accurate movements for the cutting table. Smaller machines might still use a single drive on only one side while the other side uses an idler.
As speed and width of plate increase, so does the need for a dual-side drive machine. The new solid-state, fiber-optic controls are efficient at repeating the same movement with accuracies of less than 0.1 mm (0.0040 in.)
However, this mechanical performance can be upset when the rails, ways or gears are dirty or spatter lands on them. These parts are better protected in today’s machines, but nothing replaces quality maintenance when looking for accurate, high-performance production.
A weak link can cause poor accuracy
Heat is one of the less visible enemies of accurate flame cutting. Plate coming in from an outside area at -10 degrees Fahrenheit and then being heated in one spot with a 5,000 degree Fahrenheit flame will move. Less movement is seen when the plate is allowed time to at least warm up to 50 degrees Fahrenheit.
The torch is the next issue. We’ve all seen an operator use a bubble level to determine the perpendicularity of the torch to the plate. However, it’s the Oxygen that does the cutting, and it’s the invisible oxygen-gas stream that needs to be accurately positioned. To get the gas perpendicular to the work, the level is placed on the brass or stainless steel tube that has a smooth design to allow the torch to be raised and lowered depending on the thickness of the cut metal. The problem is that this reading is usually inaccurate.
If you look at the isometric drawing of a common torch, you will see the head is independent with respect to its brass or stainless steel barrel. The barrel might be perpendicular, but the head could be several degrees out. This common error sacrifices flame-cutting accuracy, adds unnecessary expense and can lead to hours of grinding, trimming and remeasuring to make parts fit because they won’t be cut accurately.
Again, look at the isometric view. The barrel is attached to the valve body using two 6-32 bolts that are 180 degrees apart. The head might free-float compared to the other end of the barrel, or it might, on some models, be attached using two more bolts. The operator uses two 12-inch crescent wrenches to replace the cutting tip. Therefore, maintaining the perpendicularity of the head to the plate is quickly lost.
Another issue is that some lower cost tips are not drilled square to the plate (work) plane.
“A customer once told me that he was buying hand-selected tips for $25 each, says Larry Cherne, Marketing Manager, Laser Gases for Linde. “These tips were factory tested for perpendicularity, and that he would reject at least half of the shipment.”
Linde switched the provider to an OEM torch company that had newer drilling equipment and the tips sold for $15 each. Tip reject dropped to less than one tip per 250 tips he used. Part squareness improved to less than 1 degree; it had nearly zero angularity, and shape accuracy improved to better than two tenths of a degree when the cutting oxygen was perpendicular to the plate.
Additional cutting speed was achieved in multi-torch cutting because all the torches were cutting the same thickness. The efficiency improvement benefited the bottom line while reducing the lead time for the company’s products.
“It helps to know your supplier so you can ask how tip accuracy is maintained,” says Cherne. “It might disappoint your purchasing department when they find a cheaper tip and you say no to its use, but the benefits are not in the cost of your products; it’s the quality you produce.”
Improve your straight-cutting torch performance
Performing these steps below is fundamental for obtaining accurate flame cutting. The test will likely indicate that your gas-cutting stream is out of alignment. Warning: these steps should be performed by trained torch repair technicians only.
- Obtain a pillow-block bearing with a 1.375 in. inside diameter.
- Mount the bearings to a flat surface
- Slide the torch through the bearings
- Install a flame-cutting tip
- Light the torch and turn on the cutting oxygen
- The bearings will allow you to rotate the torch while lit
- Observe the position of the oxygen-cutting stream, because it’s the cutting tool point.
- If it’s perpendicular to the plate’s position, then you’re all clear.
Rotating the lit torch with the cutting oxygen on will quickly indicate the amount of angularity you’ll have in the cut parts.
To repair this deficiency, mark the high side and push it in the direction you need to go.
Then retest until the gas stream is true or perpendicular to where a cutting plate would be.
Shut off the Gases and remove the fuel and oxygen-gas hoses then purge the torch with nitrogen at about 20 to 30 cfh. This is done to ensure that oxides don’t form inside the torch while you braze the head of the torch to the barrel.
Use a 56-percent, food-grade silver for brazing. It has a low melting point. Braze only three very small spots to attach the barrelhead. Do not overheat the torch, as you could cause a problem with the silver brazing done at the factory that seals and secures the oxygen and fuel-gas supply tubes. If you are unsure or untrained in doing this, have your authorized torch repair center do it for you.
Once this is complete, you will need to leak-test the torch to confirm that you didn’t cause a leak in the internal tubes. Do not overlook this step. Some individuals will submerge the torch in water, making sure that the tube connections at the base of the head are under the water to check for leaks. This would provide assurance that the factory-made brazes weren’t damaged.
Adjust your flame and turn on the oxygen. Now rotate the torch to confirm that the oxygen-cutting stream is perpendicular to the base plate. If it is, then you’re ready to cut parts that are square. If not, remember the brazed spots are small and silver is ductile.
Apply downward pressure to the high side and adjust. Recheck the squareness of the oxygen-cutting stream, and you should be ready to go.


